Download your Client App:
Link to Client App download is available in your welcome email or on the ‘Account Settings’ page of the Scheduled Routes Console. You will log in using your credentials from the same login from your Console, or create a user in the ‘User Management’ Space on the console. If you’re on your primary work computer use the ‘remember me’ check box to ensure you won’t need to enter your password every time you launch.
Once logged in your first screen will be the ‘Schedules’ screen.
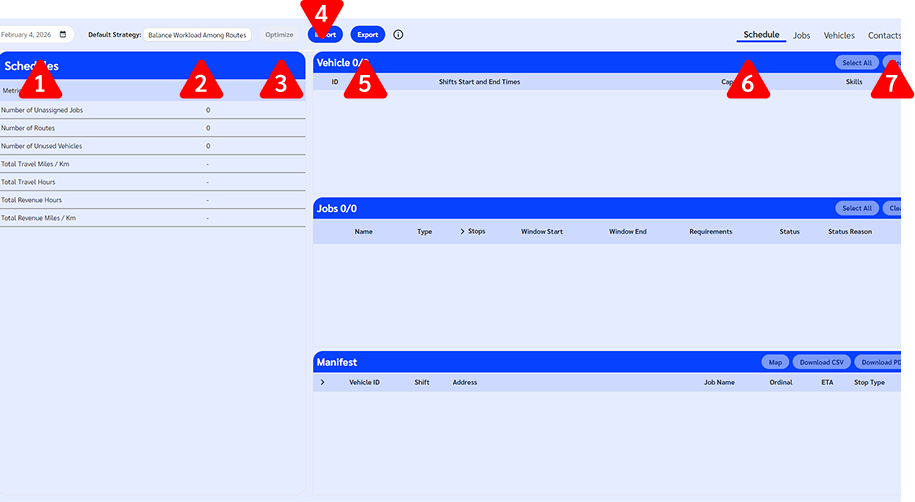
Along the top you will see:
Schedule date
Current strategy selected. You select your strategy through the Console on the Strategies and Metrics tab.
Optimize button – Once you have uploaded all the information about your route needs this will trigger a Schedule creation. In this view it is disabled as we have not added any data.
Import button – This is where users can upload Vehicle Types, Fleet, Jobs and Contacts data sets.
Export button – This is where users can export the Vehicle Types, Fleet, Jobs and Contacts templates.
Page Tabs – This is where you navigate to different areas
Hamburger Menu – Opens Settings, Privacy Statements, About and where you Log Out.
Entering Your Data
There are two ways you can enter the data into the Scheduled Routes system. Option one is by manually entering the details into the jobs, vehicles and contacts pages. Option two is to upload the data using our Import feature.
Importing Data
Our data import process can be done one of two ways. There are templates available to if you would prefer manually prepare your spreadsheet for upload, but we also offer a data mapping tool to ensure wherever your data is being exported from we can match the information to our required fields.
Data Mapping
Our system will recognize when an import does not match our template and suggest the data mapping tool, but if you would prefer you can also go directly to this tool by opening the ‘Settings’ through the hamburger menu.
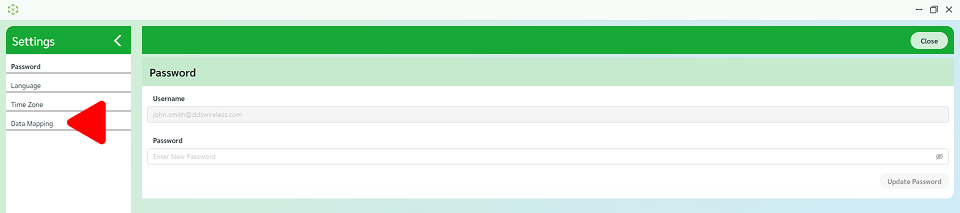
Select Data Mapping from the left side menu.
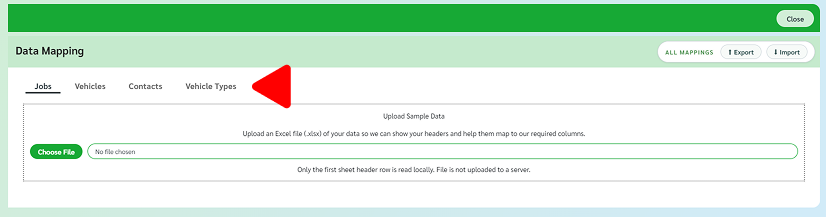
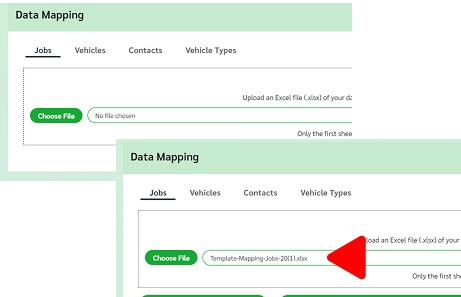
Select the file type.
Upload your sample file. Because you are using it to map your current format to be compatible with the system needs you only need a few sample sets for each category or column value.
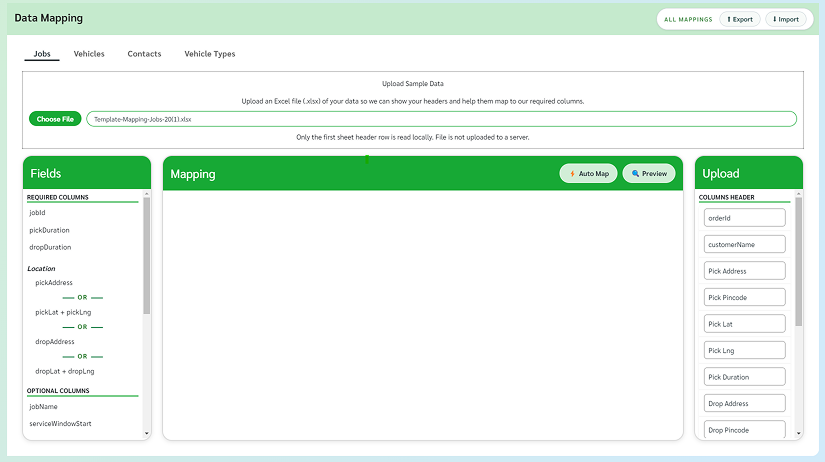
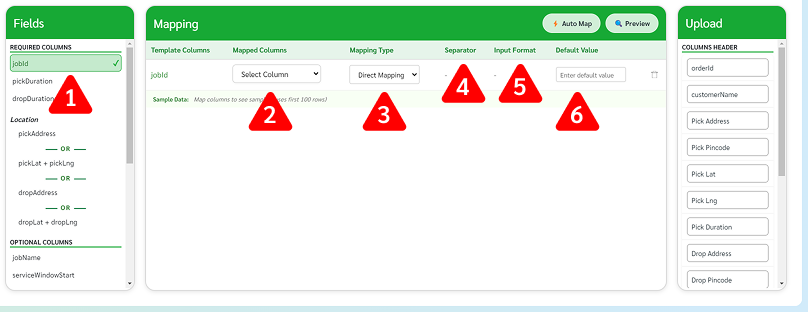
Along the left side the Fields panel will display all the required and optional fields the system will use.
Along the right side the Upload panel will display all the column headers from your sample upload. If there are columns you do not wish to include in the mapping from your upload you can hide those columns from selection by clicking on the column name (these might be things like notes fields that will not be part of your schedule output).
The center is where the mapping will take place. Along the top we have two buttons, one for Auto Mapping which will use AI powered language and format recognition to match your column headers to Scheduled Routes required fields.
Auto Mapping After clicking the ‘Auto Map’ button Scheduled Routes will match up uploaded column vales and corresponding fields. Below each mapped set will be an example of the data selected so users can verify the values are the intended match. All auto mapped items are editable.
Manually Mapping
Select the Scheduled Route field you wish to map. Required Columns are shown at the top of the fields panel.
Select the corresponding Column Header from the drop down menu.
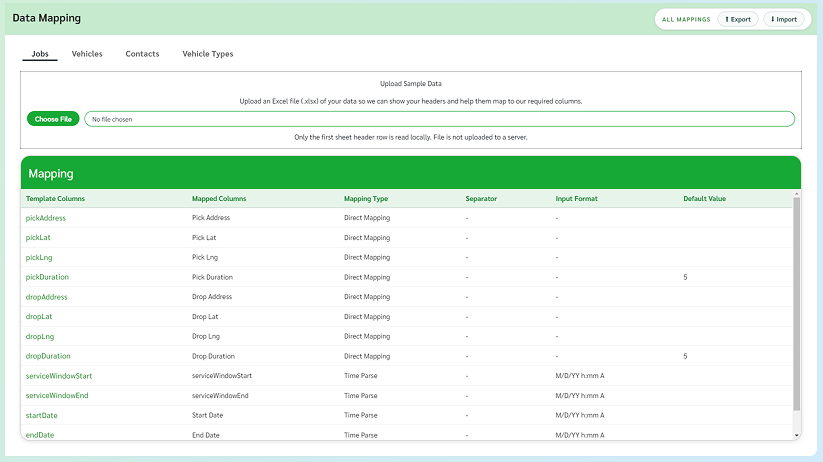
Select the mapping style (i.e. direct mapping where the values can be seen as 1:1 or concatenate where several columns will be combined). For values that must be date or time, for ‘start date’ as an example, the mapping type will change to Time Parce.
Separator – when using concatenate determine the separator
Input Format – when Scheduled Routes identifies the Time Parce mapping type for values that require dates and times you can identify the input formatting.
Default Value – where applicable users can create a default value for template columns in the event there is no value entered
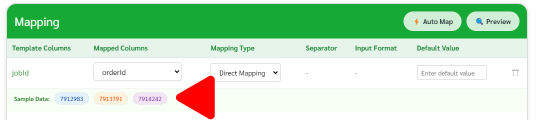
Once a column is mapped you will see sample data below the mapped section. This data is pulled from the first three populated cells below the header of your upload so you can verify these values.
When all column values are mapped use the preview button to review all the transformed data.

To complete data mapping simply close the settings and all current maps will be saved.
Editing Mapping
Editing of Mapping can be done either by changing the auto map elements before saving or at any point by revisiting saved maps in Settings.
Previously saved data maps will be display only without an active upload of the desired file type.
When editing mapping users must first ensure there is an active upload within the data mapping system.
Once a file is uploaded proceed with any desired changes or updates and exit ‘Settings’ to save changes.
Importing/Exporting Mappings

Data maps are available to import or export as a JSON file. All mappings will either be imported or exported as a single file by clicking on either the Import or Export button.
Manually Entering Data
When manually entering your data you will need to enter vehicles and jobs before optimizing a schedule. The more data entered onto these pages will result in a more exact schedule providing for all needs.
Jobs Page
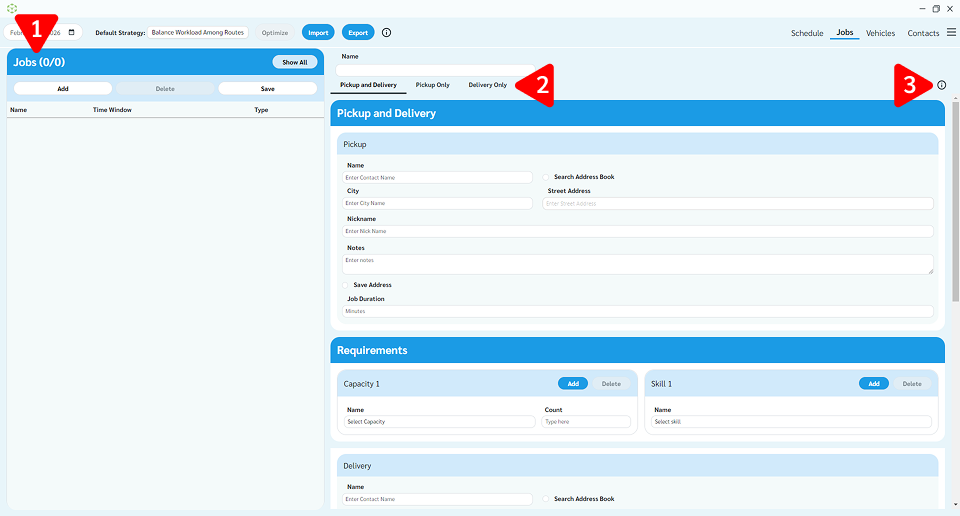
Jobs Widget – a list of your jobs filtered by the day selected in the top left corner.
Job Type pages
Info – definitions and instructions
Assign the job a unique name
Use the tabs to select the job type you wish to create:
• Pickup and Delivery – this job type will require a start and end point
• Pickup Only – Requires only one address (start point for routes with only these types of trips will have their start point determined by vehicle’s garage or first stop)
• Delivery Only – Requires only one address and behaves in a similar fashion to Pickup Only jobs

Vehicles Widget – This will list all of your vehicles by their designated unique ID, and indicate the number of shifts it has available.
Tabs to capture details about the vehicle (Capacities or how much a vehicle can carry, Shifts or when a vehicle is available, Skills or attributes of the vehicle that are not related to capacity, and Limits which are related to how far a vehicle can travel and how many stops it can accommodate). Vehicles displayed are automatically filtered to display only those vehicles available on the selected date in the top left corner. The ‘Show All’ button will display all vehicles.
Info – this helps define what we are asking for in the fields.
Create a Vehicle
To create a new Vehicle all that is required is the Vehicle ID, which is required to be a numerical value. Enter the desired numbers and select ‘Save’ button. Saving a vehicle with only a vehicle ID will populate the default value for all other fields.
Default Values
Capacities
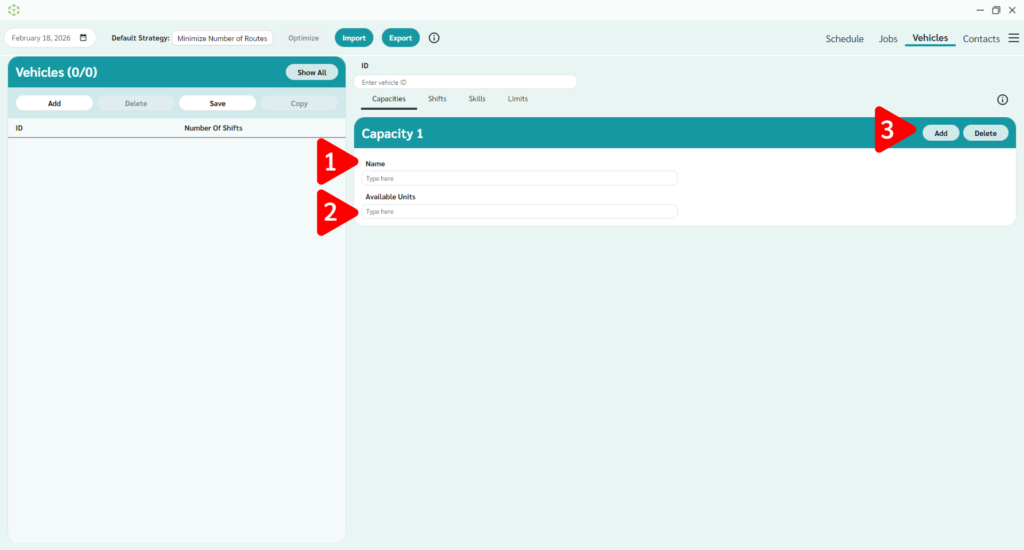
Capacities can be given any name.
Available units are the number of that item that can safely be used on the vehicle.
You can add different capacities but keep in mind they would be stacked (ie a vehicle might have two wheelchair spots and three additional seats).
Shifts
Shifts can be used to setup different vehicle start or end times to coordinate with driver hours.
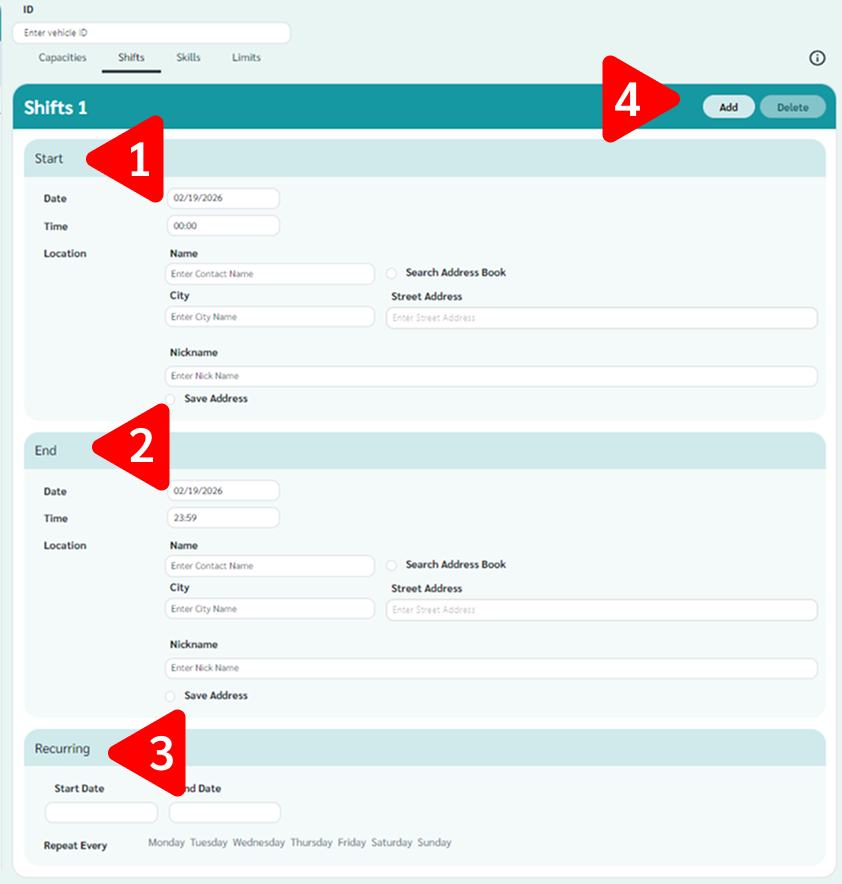
Start – Used as time and/or location.
End – Time and/or location.
If this repeats, designate a start and end date with which days of the week the shift might reoccur.
To use the address search feature (which will search your existing contacts) tick the ‘Search Address Book’ box.
Skills
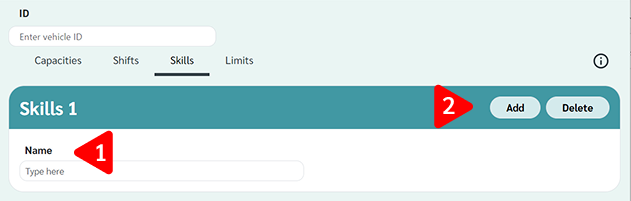
Create a unique name
Add or Delete skills as desired
Limits

Maximum distance has to do with how far a vehicle can travel in a day. This number is either metric or empirical depending on your localization (found in Settings)
Maximum stops per trip will limit the number of jobs that will get put on any one trip.
The default values are displayed.
Duplicating a Vehicle
If you have more than one vehicle that fit many of the same properties use the ‘Copy’ button and it will generate another vehicle with the exact specifications. Select the vehicle ID you wish to copy, click the ‘Copy’ button, and the system will assign the next available unique numerical value.
Deleting a Vehicle
To delete a vehicle, select the vehicle and click delete.
Contacts
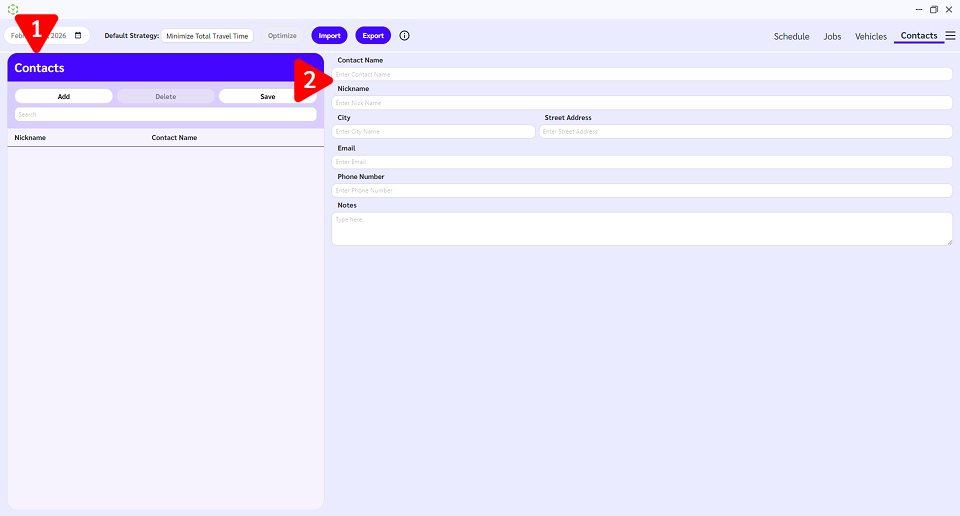
Contacts List – this will list all your saved contacts and addresses.
Contact form – where a new contact is created or where a contact is displayed.
Creating a Contact
If you have a previously selected contact start by clicking ‘Add’ button. You will need to populate the following data:
Contact Name
Nickname
When all desired fields are completed use the “Save” button.
Deleting a Contact
Search and Select the contact you wish to remove then click the “Delete” button.
Settings
In Settings you can do the following:
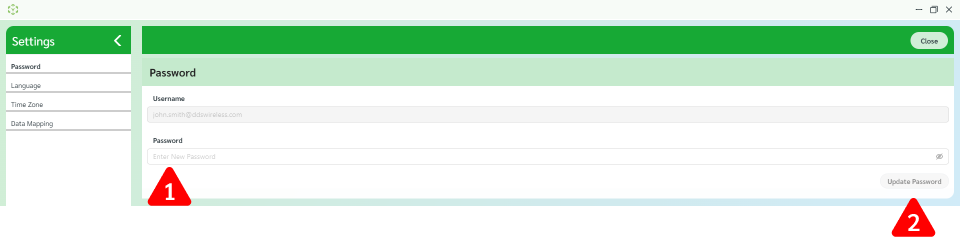
Enter your new password
Click update

To update your language simply select a different language. Scheduled Routes currently supports the following Languages:
English
Suomi
Francais
Svenska
Deutsch
Time Zone

To update time zone select from the drop down list.
FAQ
Where do I find my billing information?
Billing and Usage details are available on the Customer Portal in “Account Settings”
How do I change my Default Strategy?
Default Strategy is set through the Customer Portal on the “Strategies and Metrics” page. To test different strategies update your default and Optimize in your Client.
How do I update my units of Measurement?
Unit of Measurement is set in the Customer Portal in “Account Settings”